The MSI Z170A Gaming M7 Review: The Step Up to Skylake
by Ian Cutress on September 21, 2015 12:30 PM EST- Posted in
- Motherboards
- Gaming
- MSI
- Skylake
- Z170
Board Features
| MSI Z170A Gaming M7 | |
| Warranty Period | 3 Years |
| Product Page | Link |
| Price | Amazon US |
| Size | ATX |
| CPU Interface | LGA1151 |
| Chipset | Intel Z170 |
| Memory Slots (DDR4) | Four non-ECC DDR4 Up to 64GB Dual Channel, Up to 3600 MHz |
| Memory Slots (DDR3L) | None |
| Video Outputs | 2x HDMI (4096x2160@24, 1600p60) DisplayPort (4K60, 1600p60) |
| Network Connectivity | Killer E2400 |
| Onboard Audio | Realtek ALC1150 |
| PCIe Slots for Graphics (from CPU) | 2 x PCIe 3.0 (x16, x8/x8) |
| PCIe Slots for Other (from PCH) | 1 x PCIe 3.0 x4/x2 4 x PCIe 3.0 x1 |
| Onboard SATA | Six, RAID 0/1/5/10 |
| Onboard SATA Express | Two |
| Onboard M.2 | 2x PCIe 3.0 x4 or SATA, RAID 0/1, NVMe Support |
| Onboard U.2 | None |
| USB 3.1 | 1 x Type-A 1 x Type-C ASMedia ASM1142 Controller |
| USB 3.0 | 2 x Rear Panel 4 via headers |
| USB 2.0 | 3 x Rear Panel 4 via headers |
| Power Connectors | 1 x 24-pin ATX 1 x 8-pin CPU |
| Fan Headers | 2 x CPU (4-pin) 3 x CHA/SYS (4-pin) |
| IO Panel | 1 x Combination PS/2 3 x USB 2.0 (Hotkey/BIOS Flashback) 2 x USB 3.0 1 x USB 3.1 Type-A 1 x USB 3.1 Type-C 1 x Network RJ-45 2 x HDMI DisplayPort Audio Jacks Clear CMOS Button |
| Other Features | Power/Reset Buttons TPM Header Two-Digit Debug Display Game BOOST Dial Slow Mode Switch Front Panel Header Front Audio Header |
The struggle between Killer and Intel as the network controller of choice is starting to drag on. This is the new variant of the Killer NIC, the E2400 claims to have better UDP performance for gaming than before, and along with its network prioritization software is often cited as a cheaper bundle than the Intel NIC on its own. But many users prefer Intel for overall performance, reliability and option set. Ultimately most people choosing this board are not going to notice much difference between the two, unless they end up with a specific issue with it, or they have a particular need for one over the other.
Because the board uses an x8/x8 configuration with an x4 from the chipset, rather than x8/x4/x4 from the CPU directly, two-way SLI should work at all times with two identical NVIDIA cards capable of doing so and even with a card in the third slot. I would expect most motherboard manufacturers to do this, although from our big motherboard preview it is clear that some are not. So a plus one for MSI here.
In The Box
We get the following:
Driver Disk
Rear IO Shield
Manual
Four SATA Cables
One Flexi SLI bridge
M-Connectors
MSI Door Hanger
MSI Badge
XSplit License
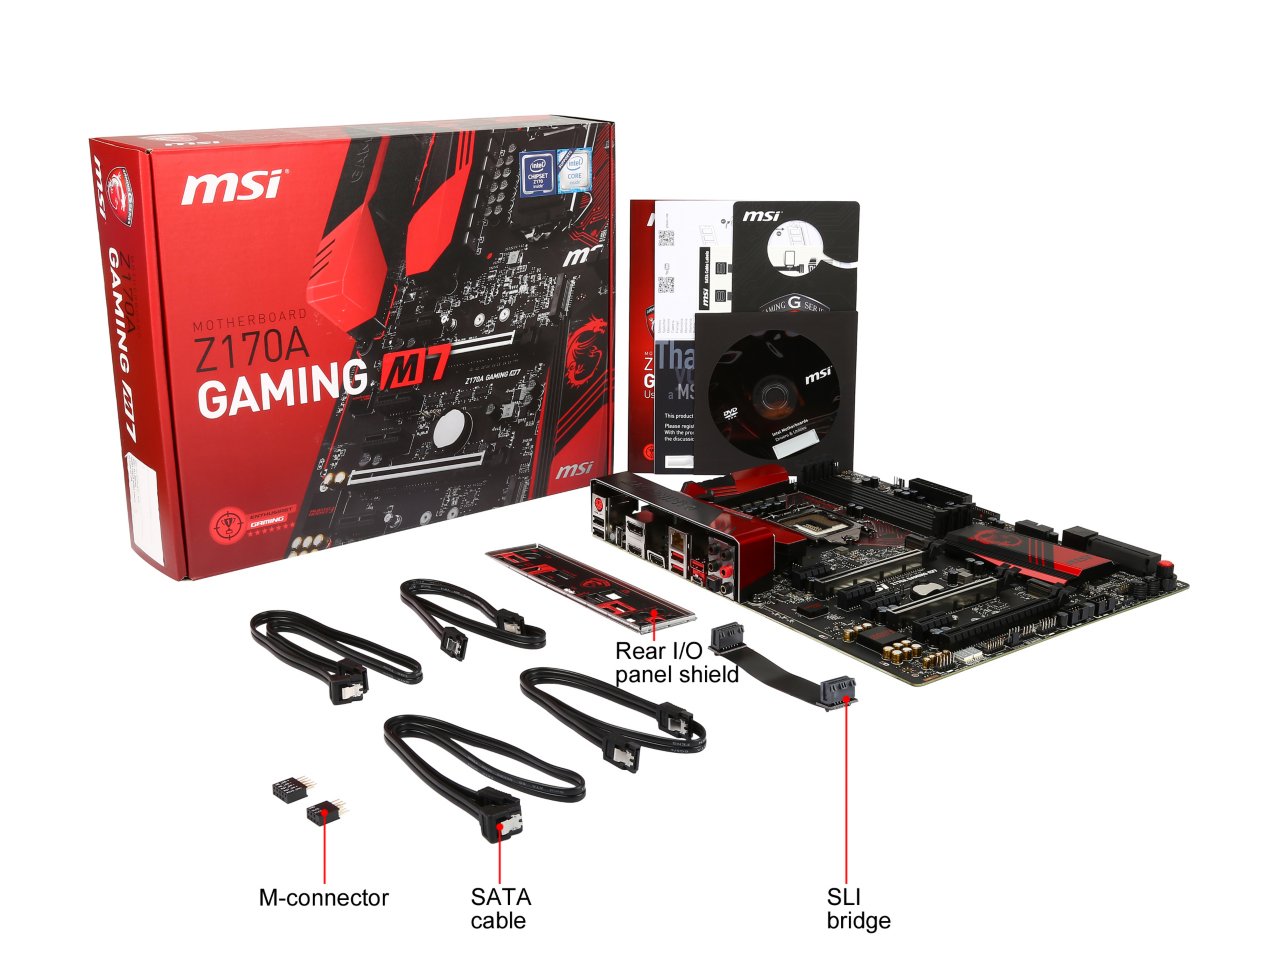
To what extent should a gaming product have gaming paraphernalia in it? The M7 has a door hanger (which seems aimed at a particular age bracket still in education), an MSI badge (which was pilfered by my intern during testing for the back of his smartphone), and a short term XSplit license for game broadcasting. Non gamers will find the contents rather dull for $230 - other motherboards in this price range will also bundle in a USB 3.1 front panel, so there is that to consider.
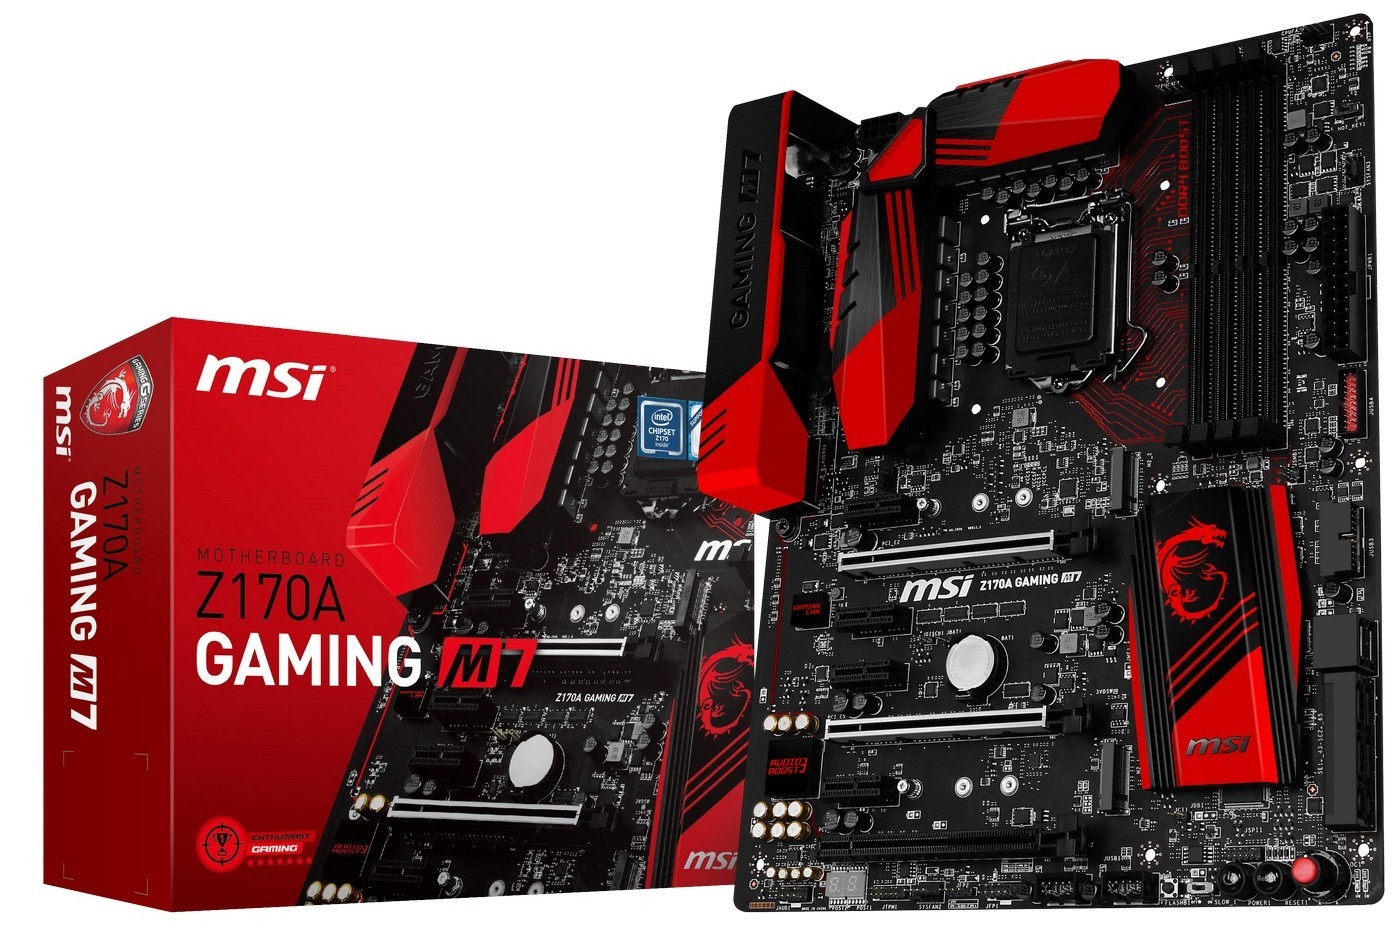
Visual Inspection
MSI deserves some credit when it comes to actually looking at the Z170A Gaming M7 – taking it out of its box and there is a sense of polish to the product in the way it looks. The shade of red used fits in well with the black on the PCB that matches the black on the PCIe slots, SATA ports and other heatsinks. The decals are of high quality, and the pseudo-traces in red from the CPU to the DRAM make it feel a little futuristic.
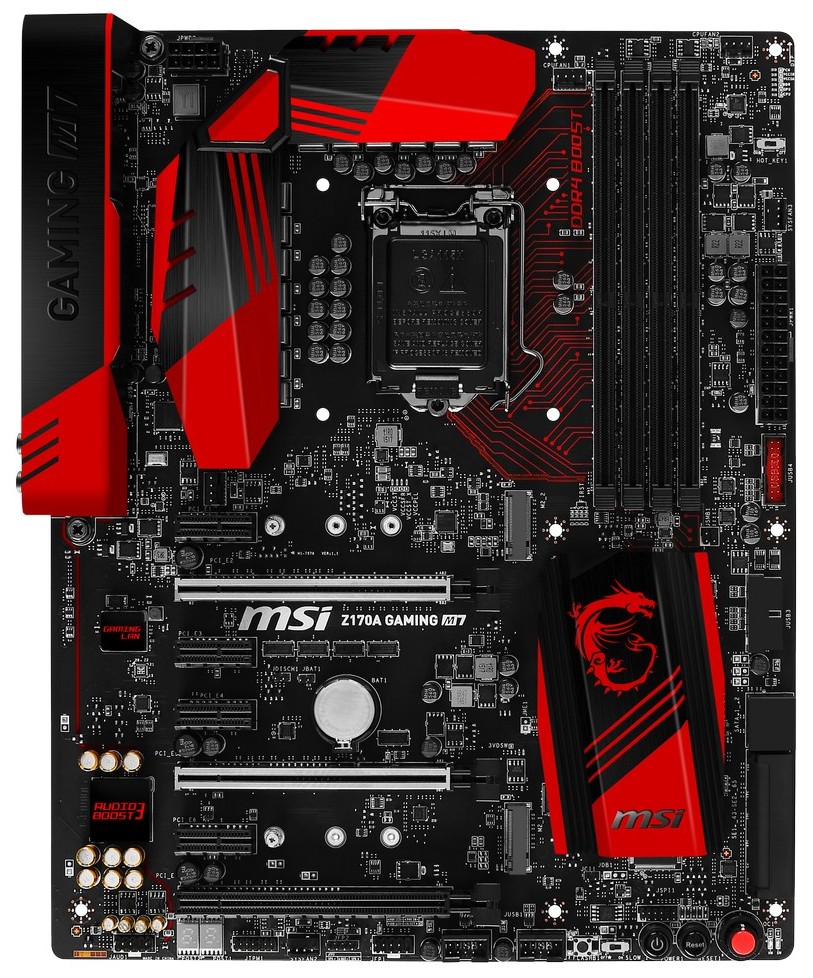
On the top down view, it is clear that the socket area does not have the brash white of the Intel recommended distance motif around it, so as not to remove the aesthetic. Around the socket itself, there are four of the five fan headers within easy access – two 4-pin CPU headers to the top and right, one 4-pin SYS just above the PCIe 3.0 x1 slot and a 4-pin SYS above the 24-pin ATX power connector. The final 4-pin SYS header is at the bottom of the board.
Part of the cost of the board will have gone towards the power delivery here – as Skylake moves the voltage regulation from the CPU back onto the motherboard, there is more scope to customize the power delivery that feeds into the processor. Technically the CPU can run on as little as four power phases (or three for the daring), but there will be a number of 8-12 or 16+ in the product stacks. Here MSI uses a 12 phase design with their Titanium capacitors, for example.
Down the right hand side is a HotKey switch, used for resetting MSI’s HotKey functionality. Below the power connector is a USB 3.0 header with red inside, indicating its fast charging capabilities. Below this is another USB 3.0 header but at the same angle as the SATA ports as to not interfere with a PCIe card that might be installed. The SATA ports are split between a block of two and a block of four, with that four part of the two SATA Express ports but can also be used purely as just SATA ports.
Along the bottom are the power and reset buttons, along with the Game BOOST dial. As noted in the overclocking section, this dial goes up to 11. Beside this there is a slow mode switch, the BIOS Flashback button, two USB 2.0 headers, the front panel header, a fan header, the TPM header and the two digit debug display. So it is interesting that the front panel header is so far along the bottom of the board – in most cases, it is better to find it closer to the SATA ports.

The PCIe slots for GPUs are clearly marked with their protective shielding. The purpose behind this shielding is to increase the rigidity of the plastic PCIe connector. According to the motherboard companies who deal with returns, the PCIe connectors can be bent when large video cards are subject to excess forces (imagine shipping a PC with the cards installed). The shielding is designed to help that in some respects as some graphics cards move close to (and beyond) the 1kg mark, especially if large copper water cooling plates are attached. It amounts to a fix for a ‘minor’ issue, though it would be interesting to see actual force diagrams and videos relating to how this protection works, given that it is fixed only to several small points on the PCB.
On the left hand side of the board is the audio solution, an upgraded Realtek ALC1150 audio package that we commonly see on motherboards around this price point. This means an electromagnetic interference shield, filter caps and PCB separation between digital and analog signals. For MSI it also involves enhanced corrosion protection of the rear IO audio ports. Near to the audio codec shield is a shield covering the gaming network controller, the Killer E2400. It surprises me that this controller has a shield, when in previous generations of the Killer NIC one is not needed. Quite apart from which, I’m unsure as to what benefits a shielded NIC would have, and we would have to see if it is similar to other motherboards indicating an issue with the NIC or if this is just an MSI design choice.
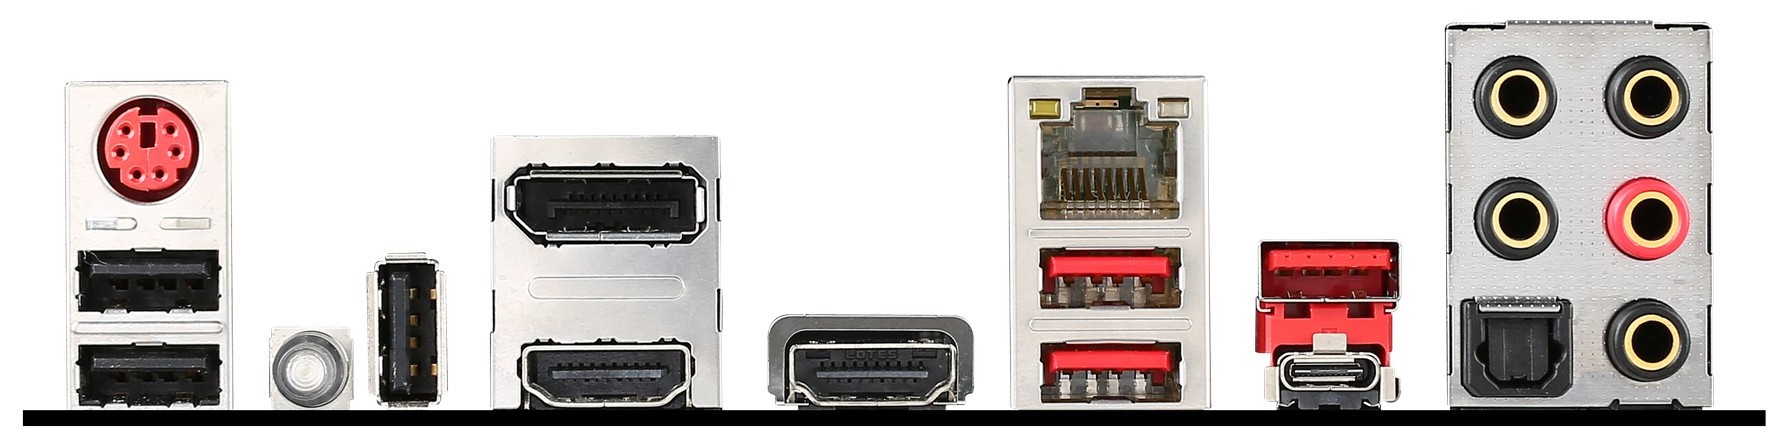
The rear panel for the Gaming M7 consists of a combination PS/2 port, two USB 2.0 ports beneath this, a ClearCMOS button, a third USB 2.0 port but is at right angles and used for MSI’s overclocking/monitoring software to a smartphone/tablet app, DisplayPort, dual HDMI 1.4b, the Killer network port, two USB 3.0 at 5 Gbps (in red), a USB 3.1-A at 10 Gbps and a USB 3.1-C at 10 Gbps. Finally we have the audio ports.
Test Setup
| Test Setup | |
| Processor | Intel Core i7-6700K (ES, Retail Stepping), 91W, $350 4 Cores, 8 Threads, 4.0 GHz (4.2 GHz Turbo) |
| Motherboards | MSI Z170A Gaming M7 |
| Cooling | Cooler Master Nepton 140XL |
| Power Supply | OCZ 1250W Gold ZX Series Corsair AX1200i Platinum PSU |
| Memory | Corsair DDR4-2133 C15 2x8 GB 1.2V or G.Skill Ripjaws 4 DDR4-2133 C15 2x8 GB 1.2V |
| Memory Settings | JEDEC @ 2133 |
| Video Cards | ASUS GTX 980 Strix 4GB MSI GTX 770 Lightning 2GB (1150/1202 Boost) ASUS R7 240 2GB |
| Hard Drive | Crucial MX200 1TB |
| Optical Drive | LG GH22NS50 |
| Case | Open Test Bed |
| Operating System | Windows 7 64-bit SP1 |
Readers of our motherboard review section will have noted the trend in modern motherboards to implement a form of MultiCore Enhancement / Acceleration / Turbo (read our report here) on their motherboards. This does several things, including better benchmark results at stock settings (not entirely needed if overclocking is an end-user goal) at the expense of heat and temperature. It also gives in essence an automatic overclock which may be against what the user wants. Our testing methodology is ‘out-of-the-box’, with the latest public BIOS installed and XMP enabled, and thus subject to the whims of this feature. It is ultimately up to the motherboard manufacturer to take this risk – and manufacturers taking risks in the setup is something they do on every product (think C-state settings, USB priority, DPC Latency / monitoring priority, overriding memory sub-timings at JEDEC). Processor speed change is part of that risk, and ultimately if no overclocking is planned, some motherboards will affect how fast that shiny new processor goes and can be an important factor in the system build.
For reference, the MSI Z170A Gaming M7, on our testing BIOS v142, MCT was enabled by default. Also, the FCLK 10x ratio was not present in the BIOS tested at the time of testing.
Many thanks to...
We must thank the following companies for kindly providing hardware for our test bed:
Thank you to AMD for providing us with the R9 290X 4GB GPUs.
Thank you to ASUS for providing us with GTX 980 Strix GPUs and the R7 240 DDR3 GPU.
Thank you to ASRock and ASUS for providing us with some IO testing kit.
Thank you to Cooler Master for providing us with Nepton 140XL CLCs.
Thank you to Corsair for providing us with an AX1200i PSU.
Thank you to Crucial for providing us with MX200 SSDs.
Thank you to G.Skill and Corsair for providing us with memory.
Thank you to MSI for providing us with the GTX 770 Lightning GPUs.
Thank you to OCZ for providing us with PSUs.
Thank you to Rosewill for providing us with PSUs and RK-9100 keyboards.


56 Comments
View All Comments
tygrus - Tuesday, September 29, 2015 - link
Check RAM and contact the shop you bought the MB from. You can ask for them to check the MB (and other components bought from them) and may be ask to swap the MB if you think it's the guilty component.Morawka - Monday, September 21, 2015 - link
I love the motherboard but i cant get by with only that few usb ports on the back... Mouse, Keyboard, Printer, Xbox 360 wireless adapter, UPS and i'm full (and that's using every type a port on the back). Still need room for Wireless AC adapter, and a full time backup USB 3.0 External HDD. hate to use the front ports for any of the stuff i mentioned above.I guess if you don't mind having a hub taking up space on your desk, and all the cable clutter that comes with it, then this board is for you.. My monitors even have usb 3.0 hubs but i am really hesitant to use them since they don't work when the monitor goes into standby.
With all that said, this is a amazing looking board.. I love the high quality PCI Express headers, and the Red Memory wire traces. that is sick. All other i/o options look ok as long as your not rolling DVI monitors.. to this day, display port still has tons of issues related to hotplugging. when you turn your monitor off, it thinks it's totally disconnected. DVI doesn't do that. Some power saving profiles and standby settings can really screw up display port driver, causing you to have to swap ports to get the monitor back on.
Captmorgan09 - Monday, September 21, 2015 - link
You could always use a front panel USB adapter like this to give you more USB options on the back. http://www.newegg.com/Product/Product.aspx?Item=9S...Impulses - Monday, September 21, 2015 - link
You're telling me... I have a UPS, keyboard (x2 ports), backup HDD, and a display hub connected directly...Then I've got the mouse connected to that keyboard and off the one display hub I've got two other display hubs; THEN on those two there's some non essentials like desk lighting strips, webcam, Bluetooth dongle, and wireless mouse dongle.
Leaves me with one free Type C port on the back, one on the displays, and then the front ports.
Luckily the ASUS Z170 board I chose has a decent number of front headers (2x 3.0 & 1x 2.0 IIRC) despite only having 6x on the back, so I have those free for a card reader, game pads, thumb drives, etc.
Would've been nice to have at least 8 on the back in case I ever switch my DAC from optical to USB and whatnot tho.
Michael Bay - Sunday, September 27, 2015 - link
>desk lighting strips, webcam, Bluetooth dongleREMOVE
LauRoman - Monday, September 21, 2015 - link
Left of the onboard power buttons, i see two usb2 headers and you could use a backplate usb adapter. If you want usb3 on the back, between the atx header and the sata connectors i see two usb3 hearders.LauRoman - Monday, September 21, 2015 - link
LE i forgot to mention that boards have come with connectors such as this for at least a dozen years. Sure, some have had weird/exotic layouts, but most have had a standard set.Morawka - Monday, September 21, 2015 - link
yeah but those usb brackets demolish any hope of having a window case build with a clean look. They to short 100% of the time to route behind the motherboard.bigboxes - Tuesday, September 22, 2015 - link
LOL. I like a clean look as anyone else. However, I'm all about function over form. I have no window in my case and it sits under my desk and out of the way. Whatever the case, you do know that you can buy an extension cable or a USB card that fits in an PCIe expansion slot?Morawka - Tuesday, September 22, 2015 - link
yeah i could buy add in cards, or i could just buy a different motherboard... my point was, they should have added another x2 stack of usb ports on top of that lone HDMI connector (huge amount of wasted space)it effectively has 2 USB 3.0 ports and 1 USB 3.1 port (The type c port cant even be used for a year or two, nothing exist that you would plug in the back, and still use type c)