Construction - Build, Appearance, Size
The external differences between the i-Buddie XP and the i-Buddie 4 are cosmetic for the most part and the outside of both systems are seemingly identical. Like we commented before, the i-Buddie looks just like a standard notebook. If you are familiar with a notebook and feel comfortable using one, you should feel right at home with the ECS i-Buddie solutions including the i-Buddie XP.
The i-Buddie XP uses a different color scheme than the i-Buddie 4 uses. The Athlon based desknote is silver and white, making it slightly less conservative than the gray and light purple colors of the i-Buddie 4. From pictures we were not sure if we would like the new color layout but when we got our hands on the system we were pleased with the result. The i-Buddie XP looks more friendly than the i-Buddie 4 and the glossy white finish on the lower half of the system made for a nice feel.

The screen on the i-Buddie XP is held in place when shut by two magnetic hooks that serve as a locking mechanism. Sliding the release lever on the front of the system to the right releases the hooks, which hide inside the system when not in use as they are on springs. Closing the screen pulls the hooks up thanks to a magnet and keeps the notebook from opening accidentally. This is the same mechanism used on the i-Buddie 4 and it still remains unique.
Like the i-Buddie 4, the i-Buddie XP can come with either a 15" XGA or a 15" SXGA+ TFT LCD panel. Our system was configured with the XGA panel but we would have rather seen the SXGA+ panel on the system, especially considering the size of the desknote. A UXGA option would have been nice as well, but would certainly drive up the cost of the i-Buddie XP.
The keyboard on the i-Buddie XP remains the same as the one on the i-Buddie 4, meaning that it is a full sized 85-key keyboard. Again we found ourselves pleased with the feel of the keyboard with its generous 19mm key pitch, but were a bit frustrated with the location of the function key. Like some of the other notebooks we have seen, the i-Buddie XP locates the function key at the space normally dedicated to the control key. We are sure that after a while of use finding the control key on the i-Buddie would become second nature, but it does introduce a slight learning curve into the use of the system.
We were pleased to find that the keyboard on our i-Buddie XP was less noisy than the one on the i-Buddie 4. Perhaps a slight modification in the keyboard design prevented the keys from rattling as they did in the i-Buddie 4 system we reviewed.

One positive improvement that the i-Buddie XP makes over the i-Buddie 4 is the use of a new touchpad. We mentioned in our i-Buddie 4 review that the touchpad on the system was a bit smaller than we would have liked it to be. The i-Buddie XP makes use of a larger touchpad, providing more surface area to move the cursor around in. This proved to be helpful.
Also helpful was the use of larger buttons. Both the left and right mouse buttons were slightly larger on the i-Buddie XP than they were on the i-Buddie 4. The scroll button was also improved, as it is now larger and hence more useable.
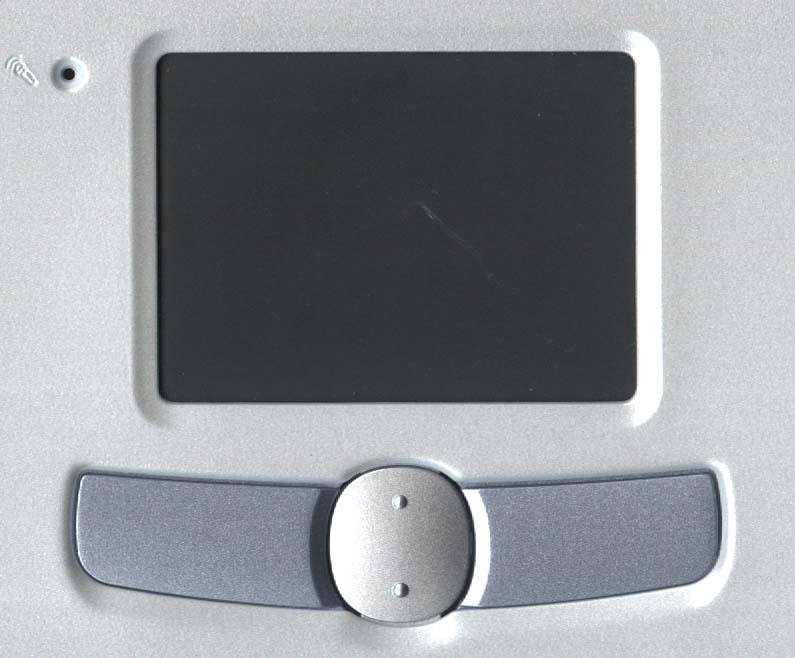
The keyboard sits just as far back on the i-Buddie XP as it did on the i-Buddie 4, meaning that there was plenty of wrist rest area. The i-Buddie XP gets rid of the ports located in the wrist area probably because, as we noted in our i-Buddie 4 review, these ports do nothing. The speakers face outward, so the ports were simply on top of the speakers. We were a bit unhappy again with the placement of the internal microphone. Like the i-Buddie 4, the internal microphone on the i-Buddie XP is located slightly to the left of the touchpad. At this location, the microphone is covered by the upper palm of the left hand whenever the hands are on the keyboard.
The i-Buddie XP maintains the upper grilled area above the keyboard that aids in ventilation. A fan mounted beneath the left side of the grill sucks cool air and blows it across the heatsink used to cool the CPU. Although the style of the function buttons located in the upper middle section of the i-Buddie XP have changed, their functions remain the same: the leftmost button is a "mail" button that launches the default mail application; the middle button acts as the power button, and; the rightmost button launches the default internet browser. There are also LEDs above the buttons that indicate hard drive access, num lock status, caps lock status, and scroll lock status.
Along the upper edge of the i-Buddie XP is a small rubber protrusion that is used to indicate when the screen is closed. Closing the screen pushes the rubber piece down and turns off the LCD backlight to save the life of the screen.
There are two status LEDs on the left side of the system. These LEDs, one that indicates power state and one that denotes standby mode, are visible both with the system open as well as with it shut.


1 Comments
View All Comments
Anonymous User - Thursday, July 31, 2003 - link
Nice review. By the way, have you heard about the new ECS DeskNote A530 Notebook. Im looking for a review, unfortunately no luck. Maybe you can create a review in the future. Thanks and more power!